
Image Processing in R with magick
Read, resize, crop, annotate, and combine images with the magick package
Data Visualization
Learn image processing in R with the magick package — read and write images, resize, crop, rotate, annotate with text, apply filters, and combine images. A tidy, pipe-friendly interface to ImageMagick.
TipWhat you’ll learn
- Read, inspect, and write images in any format (PNG, JPEG, TIFF, GIF, PDF) with
image_read()andimage_write(). - Resize, crop, trim, and rotate — and the one-line geometry syntax (
WxH+X+Y) that drives them all. - Apply filters (charcoal, oil-paint, blur, negate, modulate) and annotate images with text.
- Combine images — append side by side, overlay with
image_composite(), and build an animated GIF. - Every operation runs on magick’s built-in demo images, so you can copy-paste and run it with nothing to download — you only need
magick.
Need to resize a batch of figures, watermark a screenshot, or stitch panels into one image — without leaving R for Photoshop? The magick package binds R to ImageMagick, the most complete open-source image toolkit there is. It reads dozens of formats, its functions are vectorized (they operate on one frame or a whole stack of layers), and they pipe cleanly — so a full edit reads like a sentence. This post walks the operations you reach for most, each rendered from real, runnable code.
We’ll use images that ship inside ImageMagick — the built-in "logo:" (the ImageMagick wizard) and "rose:" — so nothing here touches the network or a local file path.
Read, inspect, and write images
image_read() is the entry point. It accepts a file path, a URL, or a raw vector of image data, and returns a magick image object that RStudio previews automatically. Here we read the built-in wizard logo:
library(magick)

img <- image_read("logo:")
img
To see what you’re holding, call image_info(). It returns a tidy data frame — one row per frame — with the format, pixel dimensions, colourspace, and whether the image carries transparency:
image_info(img)# A tibble: 1 × 7
format width height colorspace matte filesize density
<chr> <int> <int> <chr> <lgl> <int> <chr>
1 GIF 640 480 sRGB FALSE 28576 72x72 The logo comes in at 640 × 480. Reading a real file works exactly the same way — image_read("photo.jpg") or image_read("https://…/photo.png").
Writing an image back to disk is image_write(). Set format to convert on the way out and quality to trade size for fidelity:
# Save the logo as a compressed JPEG
image_write(img, path = "wizard.jpg", format = "jpeg", quality = 75)
When path is a filename, image_write() returns that path, so it slots into a pipe. To convert in memory — useful before a lossy edit — use image_convert():
img_png <- image_convert(img, "png")ImageMagick is lazy in the good sense: right after a convert, image_info() may report a filesize of 0 because nothing is rendered until an operation forces it.
Resize, crop, and rotate
Many magick functions take a geometry string of the form WxH+X+Y, where every part is optional. It’s worth memorizing once:
| Geometry | Meaning |
|---|---|
"300" |
Resize proportionally to width 300px |
"x300" |
Resize proportionally to height 300px |
"300x200" |
Fit inside a 300 × 200 box (keeps aspect ratio) |
"300x200!" |
Force exactly 300 × 200 (ignores aspect ratio) |
"100x150+50+20" |
A 100 × 150 region, offset +50px right, +20px down |
Resize with image_scale() (fast) or image_resize() (higher-quality filters). Pass a width, or an x-prefixed height:
image_scale(img, "300") # width 300px, height auto
Crop pulls out a rectangle with the geometry syntax; trim removes uniform border margins automatically:
image_crop(img, "300x300+150") # 300x300 region, starting +150px from the left
Rotate and mirror with image_rotate(), image_flip() (vertical), and image_flop() (horizontal). Assign each result, then view them side by side:
rotated <- image_rotate(img, 45)   # 45° clockwise (canvas grows to fit)
flipped <- image_flip(img)         # top-to-bottom mirror
flopped <- image_flop(img)         # left-to-right mirror
Note how image_rotate() enlarges the canvas so nothing is clipped — the corners fill with the background colour.
Apply filters and effects
magick wraps ImageMagick’s whole effects catalogue. A few favourites: image_charcoal() (sketch), image_negate() (invert colours), image_oilpaint() (painterly), plus image_blur() and image_modulate() (adjust brightness, saturation, and hue). Each takes an image and returns one:
charcoal <- image_charcoal(img)
negated  <- image_negate(img)
oil      <- image_oilpaint(img, radius = 3)
To tweak colour rather than texture, reach for image_modulate(img, brightness = 80, saturation = 120, hue = 90) — values are percentages, where 100 means “unchanged”. image_blur(img, radius = 10, sigma = 5) softens; image_border() and image_background() frame and fill.
Annotate images with text
image_annotate() burns text into an image — ideal for watermarks, labels, or a quick “CONFIDENTIAL” stamp. Control the size, color, boxcolor (a highlight behind the text), placement via gravity or an exact location, and rotation with degrees:
img |>
  image_annotate("CONFIDENTIAL", size = 34, color = "red",
                 boxcolor = "#ffffffaa", degrees = 30, location = "+40+120") |>
  image_annotate("Made with R", size = 26, color = "#3a86d4",
                 gravity = "southwest", location = "+15+15")
Fonts available on most platforms include "sans", "mono", "serif", "Times", and "Helvetica" — pass one via the font argument.
Combine images
Because magick is vectorized, a set of images is just a vector you build with c(). image_append() places frames next to each other — left-to-right by default, or top-to-bottom with stack = TRUE:
panel <- c(image_read("logo:"), image_read("rose:")) |>
  image_scale("x160")

image_append(panel)              # side by side; use stack = TRUE to stack vertically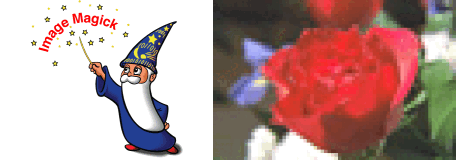
image_composite() overlays one image onto another at a chosen offset — the basis for logos, badges, and picture-in-picture:
rose <- image_read("rose:") |> image_scale("120")
image_composite(img, rose, offset = "+60+40")
For a single flattened result from a stack of layers, image_flatten() and image_mosaic() merge them into one frame.
Animate: build a GIF
magick makes animation trivial. image_morph() interpolates between frames, and image_animate() plays the stack back as an animated GIF — all inside R, no external tool:
frames <- c(
  image_read("logo:") |> image_scale("200x150!"),
  image_read("rose:") |> image_scale("200x150!")
)

frames |>
  image_morph(frames = 10) |>
  image_animate(fps = 10)
The same image_animate() turns any stack of frames — say, a series of ggplot2 snapshots — into a GIF you can drop straight into a report.
Frequently asked questions
NoteWhat is the magick package in R?
magick is an R package that binds to ImageMagick, a comprehensive open-source image-processing library. It lets you read, edit, convert, filter, annotate, combine, and animate images — across formats like PNG, JPEG, TIFF, GIF, and PDF — entirely from R, with a tidy, pipe-friendly API.
NoteHow do I install magick?
Run install.packages("magick"). On macOS and Windows the binary bundles ImageMagick, so there’s nothing else to install. On Linux, install the system library first (sudo apt-get install -y libmagick++-dev on Debian/Ubuntu), then install the R package.
NoteHow do I read an image from a file or URL?
Use image_read(). It accepts a local file path, a URL, or a raw vector of image data — for example image_read("photo.png") or image_read("https://example.com/photo.jpg"). Check the result with image_info(), which reports format, width, height, and colourspace.
NoteHow do I resize an image without distorting it?
Pass a single dimension to image_scale() (or image_resize()): image_scale(img, "300") fixes the width at 300px and scales the height to keep the aspect ratio, while "x300" fixes the height. Only a trailing ! (as in "300x200!") forces exact dimensions and allows distortion.
NoteCan magick create animated GIFs?
Yes. Build a stack of frames with c(), optionally interpolate between them with image_morph(), then play them back with image_animate(fps = ...). Save the result with image_write(anim, "out.gif").
Going deeper in /learn
magick pairs naturally with plotting: build figures in R, then annotate, crop, or stitch them with magick before export. For the full, reproducibility-gated walkthroughs, start with the plotting lessons:
- ggplot2 in R — build the figures you’ll post-process with magick.
- Data Visualization — the full visualization pillar.
Citation
BibTeX citation:
@online{kassambara2026,
  author = {Kassambara, Alboukadel},
  title = {Image {Processing} in {R} with Magick},
  date = {2026-07-08},
  url = {https://www.datanovia.com/blog/image-processing-in-r-magick},
  langid = {en}
}
For attribution, please cite this work as:
Kassambara, Alboukadel. 2026. “Image Processing in R with
Magick.” July 8. https://www.datanovia.com/blog/image-processing-in-r-magick.