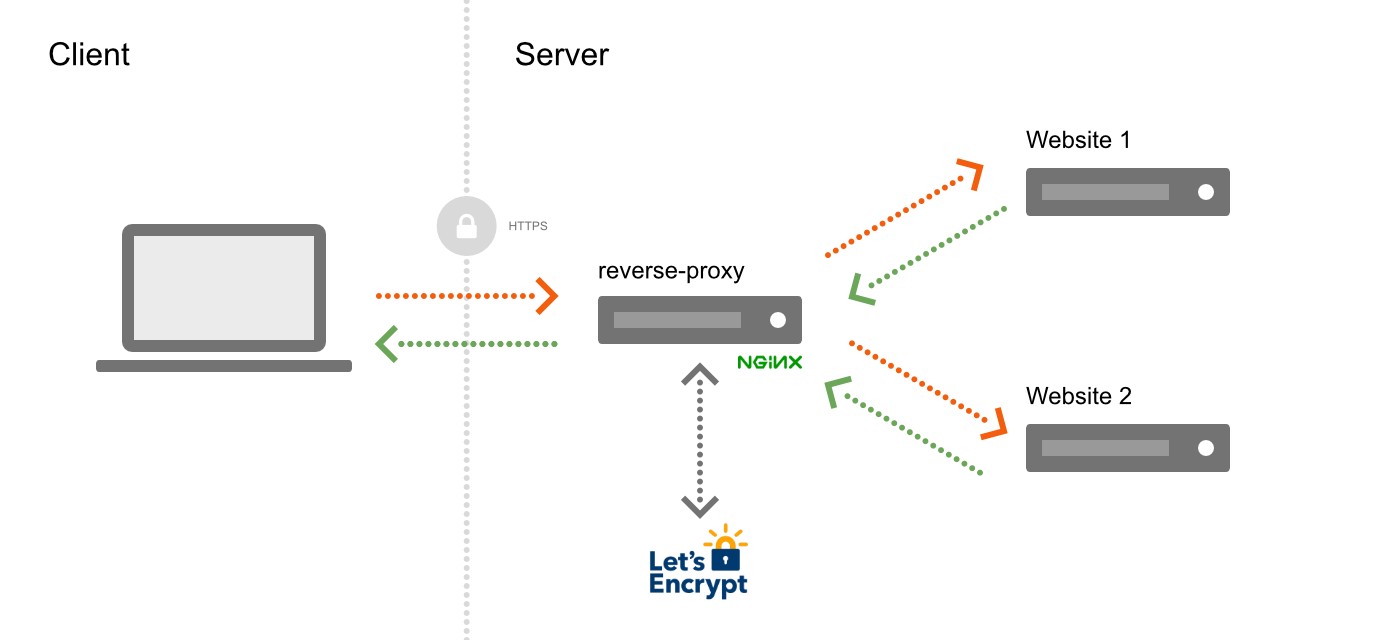
This article provides a template to easily configure the deployment of multiple websites on one server IP or on one droplet from digitalocean. Reverse-proxy, nginx configuration files and SSL certificate are created automatically for each website running in a Docker container.
Contents:
Prerequisites
Required tools and create domain names
- Git, docker and docker-compose are installed on your server
- Several websites run inside Docker containers on a single server. (Each one could either be a static files server, or WordPress running on Apache, etc.
- The domain name for each website is configured to point to the IP of the server. Your host must be publicly reachable on both port
80and443. Check your firewall rules to make sure that these ports are open. - Create a website directory and set up proper permissions. In this tutorial, we’ll assume that the web directory is at
/srv/www
Step 1: Create websites directories
Read more: Create a website directory and set up proper permissions
# 0. settings
web_dir=/srv/www
myusername=kassambara
# 1. Create the website directory
sudo mkdir -p $web_dir
# 2. set your user as the owner
sudo chown -R $myusername $web_dir
# 3. set the web server as the group owner
sudo chgrp -R www-data $web_dir
# 4. 755 permissions for everything
sudo chmod -R 755 $web_dir
# 5. New files and folders inherit
# group ownership from the parent folder
chmod g+s $web_dir
Step 2: Download a template
Download a template into your website directories www
web_dir=/srv/www
git clone https://github.com/kassambara/nginx-multiple-https-websites-on-one-server $web_dir
Step 3: Inspect the project structure and configuration files
Project Structure
www
├── README.Rmd
├── README.md
├── nginx-proxy
│   ├── certs
│   ├── conf.d
│   ├── docker-compose.yml
│   ├── html
│   ├── nginx.tmpl
│   └── vhost.d
├── your-website-one.com
│   ├── docker-compose.yml
│   └── index.html
└── your-website-two.com
    ├── docker-compose.yml
    └── index.html
Inside /nginx-proxy, there are four empty directories: conf.d, vhost.d, html and certs. These are used to store the nginx and the Let’s Encrypt configuration files.
Inspect the docker-compose.yml configuration file
Inside /nginx-proxy/, there is a docker-compose.yml file with this content:
version: '3.6'
services:
  nginx:
    image: nginx
    labels:
      com.github.jrcs.letsencrypt_nginx_proxy_companion.nginx_proxy: "true"
    container_name: nginx
    restart: unless-stopped
    ports:
      - "80:80"
      - "443:443"
    volumes:
      - ./conf.d:/etc/nginx/conf.d
      - ./vhost.d:/etc/nginx/vhost.d
      - ./html:/usr/share/nginx/html
      - ./certs:/etc/nginx/certs:ro

  nginx-gen:
    image: jwilder/docker-gen
    command: -notify-sighup nginx -watch -wait 5s:30s /etc/docker-gen/templates/nginx.tmpl /etc/nginx/conf.d/default.conf
    container_name: nginx-gen
    restart: unless-stopped
    volumes:
      - ./conf.d:/etc/nginx/conf.d
      - ./vhost.d:/etc/nginx/vhost.d
      - ./html:/usr/share/nginx/html
      - ./certs:/etc/nginx/certs:ro
      - /var/run/docker.sock:/tmp/docker.sock:ro
      - ./nginx.tmpl:/etc/docker-gen/templates/nginx.tmpl:ro

  nginx-letsencrypt:
    image: jrcs/letsencrypt-nginx-proxy-companion
    container_name: nginx-letsencrypt
    restart: unless-stopped
    volumes:
      - ./conf.d:/etc/nginx/conf.d
      - ./vhost.d:/etc/nginx/vhost.d
      - ./html:/usr/share/nginx/html
      - ./certs:/etc/nginx/certs:rw
      - /var/run/docker.sock:/var/run/docker.sock:ro
    environment:
      NGINX_DOCKER_GEN_CONTAINER: "nginx-gen"
      NGINX_PROXY_CONTAINER: "nginx"
networks:
  default:
    external:
      name: nginx-proxy
This will launch three services:
nginx: the nginx-reverse proxy, uses the default nginx image. The label is needed so that the letsencrypt container knows which nginx proxy container to use.nginx-gen: uses the jwilder/docker-gen image. Its command instruction will render a nginx configuration (based on nginx.tmpl) for each website / container added to the network.nginx-letsencrypt: generates and renew the HTTPS certificates.
All these services are bound to the nginx-proxy network.
Update nginx.tmpl: Nginx configuration file template
Inside /nginx-proxy/, there is a nginx.tmpl file. This is the used by the nginx-gen container to create the nginx configuration file for each website / container added to the network.
Download the latest updated version from Github here:
# Remove old version
rm -rf $web_dir/nginx-proxy/nginx.tmpl
# Download new version
curl -s https://raw.githubusercontent.com/jwilder/nginx-proxy/master/nginx.tmpl> $web_dir/nginx-proxy/nginx.tmpl
Step 4: Run the nginx reverse proxy
# 1. Create the docker network
docker network create nginx-proxy

# 2. Create the reverse proxy with the
# nginx, nginx-gen and nginx-letsencrypt containers
cd /srv/www/nginx-proxy/
docker-compose up -d
Step 5: Link a website to the running nginx-proxy
The docker-compose.yml file of the website, you want to link, should include the following instructions provided in the template available in the folder your-website-one.com (not the one from nginx-proxy above). The content of the template looks like this:
version: '3.6'

services:
  my-app:
    image: nginx
    restart: always
    environment:
      # NGINX-PROXY ENVIRONMENT VARIABLES: UPDATE ME
      - VIRTUAL_HOST=your-website-one.com
      - VIRTUAL_PORT=80
      - LETSENCRYPT_HOST=your-website-one.com
      - LETSENCRYPT_EMAIL=your.email@domain.com
      # END NGINX-PROXY ENVIRONMENT VARIABLES
    expose:
      - 80

networks:
  default:
    external:
name: nginx-proxy- Environment variables:
VIRTUAL_HOST: your domain name, used in the nginx configuration.VIRTUAL_PORT: (optional) the port your website is listening to (default to 80).LETSENCRYPT_HOST: your domain name, used in the Let’s Encrypt configuration.LETSENCRYPT_EMAIL: your email, used in the Let’s Encrypt configuration.
- Ports:
- the exposed port (here 80) should be the same as the
VIRTUAL_PORTabove.
- the exposed port (here 80) should be the same as the
- Network:
- your website container should be linked to the external docker network named
nginx-proxy
- your website container should be linked to the external docker network named
Once the update of the docker-compose.yml file is done, you can start the website with:
cd /srv/www/your-website-one.com
docker-compose up -d
The website is automatically detected by the reverse proxy, has a HTTPS certificate and is visible at https://your-website-one.com.
You can repeat this last step for any other container you want to proxy
Frequently asked question
How to redirect from http non-www to https www?
If you have control of the DNS record, the best practice is to take care it with an ALIAS ( or CNAME). See discussion.
Solution 1. Use redirect container. Catch all http redirect, useful for http -> https redirects. Insanely fast and small! Based on alpine and nginx. Source: cusspvz/redirect.docker
version: '3.6'

services:
  www.omicstudio.com:
    image: nginx
    restart: always
    volumes:
      - "./:/usr/share/nginx/html"
    environment:
      - VIRTUAL_HOST=www.omicstudio.com
      - VIRTUAL_PORT=80
      - LETSENCRYPT_HOST=www.omicstudio.com
      - LETSENCRYPT_EMAIL=alboukadel.kassambara@gmail.com

  # redirect omicstudio.com to www.omicstudio.com
  omicstudio.com:
    image: cusspvz/redirect
    restart: always
    environment:
      - VIRTUAL_HOST=omicstudio.com
      - VIRTUAL_PORT=80
      - HTTPS_METHOD=noredirect
      - LETSENCRYPT_HOST=omicstudio.com
      - REDIRECT=https://www.omicstudio.com
      # See available redirect parameters: https://github.com/cusspvz/redirect.docker
      - WORKER_CONNECTIONS=1024

networks:
  default:
    external:
      name: nginx-proxy
Solution 2. see this merge request: Added VIRTUAL_HOST_ALIAS support
Recommended for you
This section contains best data science and self-development resources to help you on your path.
Books - Data Science
Our Books
- Practical Guide to Cluster Analysis in R by A. Kassambara (Datanovia)
- Practical Guide To Principal Component Methods in R by A. Kassambara (Datanovia)
- Machine Learning Essentials: Practical Guide in R by A. Kassambara (Datanovia)
- R Graphics Essentials for Great Data Visualization by A. Kassambara (Datanovia)
- GGPlot2 Essentials for Great Data Visualization in R by A. Kassambara (Datanovia)
- Network Analysis and Visualization in R by A. Kassambara (Datanovia)
- Practical Statistics in R for Comparing Groups: Numerical Variables by A. Kassambara (Datanovia)
- Inter-Rater Reliability Essentials: Practical Guide in R by A. Kassambara (Datanovia)
Others
- R for Data Science: Import, Tidy, Transform, Visualize, and Model Data by Hadley Wickham & Garrett Grolemund
- Hands-On Machine Learning with Scikit-Learn, Keras, and TensorFlow: Concepts, Tools, and Techniques to Build Intelligent Systems by Aurelien Géron
- Practical Statistics for Data Scientists: 50 Essential Concepts by Peter Bruce & Andrew Bruce
- Hands-On Programming with R: Write Your Own Functions And Simulations by Garrett Grolemund & Hadley Wickham
- An Introduction to Statistical Learning: with Applications in R by Gareth James et al.
- Deep Learning with R by François Chollet & J.J. Allaire
- Deep Learning with Python by François Chollet
Version:
 Français

`chmod g+s $web_dir` is not working. You should use `sudo chmod g+s $web_dir`
There has been an update to the nginx-letsencrypt docker: it is essential now to also mount volume ./acme:/etc/acme.sh, or else the docker image will fetch a new certificate from letsencrypt on every restart – and that will quickly exceed the allowed 5 certs/week.
Thank you for your valuable comment. We’ll update ASAP.